Forms Text Insert and Formatting

This article provides detailed instructions on how to import and export keys for forms using supported controls in our software. It also includes information on hotkeys for the form builder to enhance your workflow efficiency.

This article provides detailed instructions on how to insert and format text and questions for forms. These instructions apply to all forms under the Forms tab within cAdmin. It also includes information on hotkeys for the form builder to enhance your workflow efficiency.

Supported Formatting

Basic Tools

1. Text
Any text without specific formatting will be interpreted as plain text.
Example: This is text.

2. Text Input
Syntax: : <label>
This creates a text input field with the specified label.
Example: : Name

3. Textarea
Syntax: :: <label>
This creates a textarea field with the specified label.
Example: :: Description

Grouping

Any text followed by an indented line (two spaces) will create a grouping containing the indented items.
Example:

Group Title
: First Name
: Last Name

Radio Button

Syntax: (<value>) <label>
This creates a radio button with a specified value and label.
Example:

(1) Option 1
(2) Option 2

Checkbox

Syntax: + [<value>] <label> or [<value>] <label>
This creates a checkbox with a specified value and label.
Example:

+ [1] Accept Terms
[2] Subscribe to newsletter

Empty Space

Any amount of dashes (-) will create an empty space.
Example:

-

Indentation for Nesting

An indentation of two spaces indicates a nesting level within a group or another group.
In this example, the “Comments” textarea is nested under the “Subscribe” checkbox.

Group Title
: Name
+ [1] Subscribe
:: Comments

Hotkeys for Form Builder

New Hotkeys

Remove Current Function
Ctrl + R: Remove the currently selected function.

Duplicate Current Function
Ctrl + D: Duplicate the currently selected function.

Move Current Function Up
Ctrl + Up: Move the currently selected function up.

Move Current Function Down
Ctrl + Down: Move the currently selected function down.

Existing Hotkeys

Next Function
Tab: Move to the next function.

Previous Function
Shift + Tab: Move to the previous function.

Basic Example

Follow these steps to use the provided example in a form builder:
1. Copy the text below.
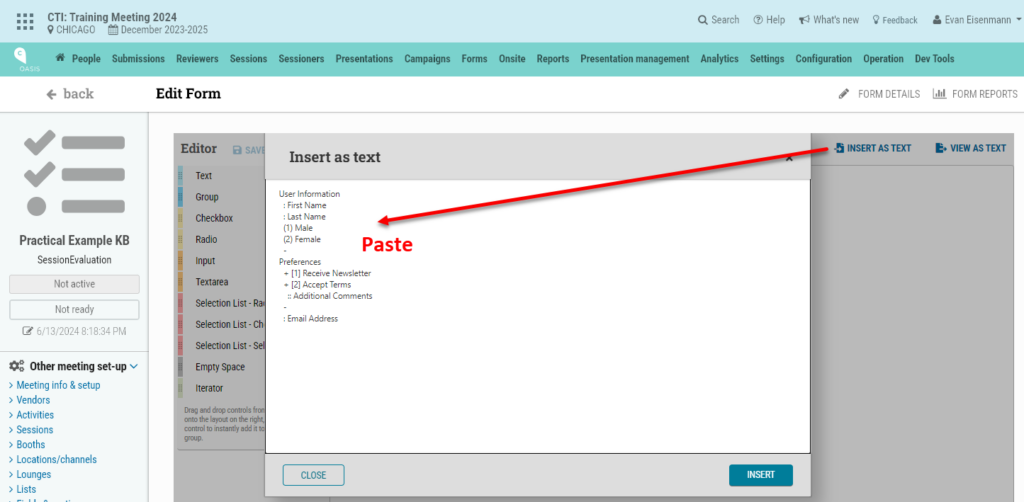
2. Open a form builder and select “INSERT AS TEXT”.
3. Paste the copied text into the popup window that appears.
4. Click “INSERT” to add the text to your form.
5. Click “SAVE” to apply your changes.

User Information
: First Name
: Last Name
(1) Male
(2) Female
-
Preferences
+ [1] Receive Newsletter
+ [2] Accept Terms
:: Additional Comments
-
: Email Address
Explanation

– “User Information” and “Preferences” are group functions.
– “First Name”, “Last Name”, and “Email Address” are text input fields.
– The radio buttons “Male” and “Female” are under “User Information”.
– The checkboxes “Receive Newsletter” and “Accept Terms” are under “Preferences”.
– “Additional Comments” is a textarea nested under the “Accept Terms” checkbox.
– An empty space is created between the groups using -.

Practical Example

Below is a practical example combining various functions and nested elements:

John Doe, MD, Association
Managing the Potential Organ Donor
-
1. All of the following are complications of brain death except:
(1) Pulmonary Edema
(2) Arrhythmias

(3) Diabetes Insipidus
(4) Metabolic alkalosis

-
2. All of the following are components to donor management except:
(1) Hemodynamic monitoring
(2) Hormonal therapy

(3) Treatment of brain death related complications
(4)
Hypotensive resuscitation

Explanation

– “John Doe, MD, Association” and “Managing the Potential Organ Donor” are text functions.
– “1. All of the following are complications of brain death except:” and “2. All of the following are components to donor management except:” are group functions.
– The radio buttons “(1) Pulmonary Edema”, “(2) Arrhythmias”, “(3) Diabetes Insipidus”, and “(4) Metabolic alkalosis” are under the group function “1. All of the following are complications of brain death except:”.
– The radio buttons “(1) Hemodynamic monitoring”, “(2) Hormonal therapy”, “(3) Treatment of brain death related complications”, and “(4) Hypotensive resuscitation” are under the group function “2. All of the following are components to donor management except:”.
– An empty space is created between the groups using -.

Delete Forms

At this time, it is not possible to delete cAdmin forms in all our form-building tools. Instead, we recommend that administrators edit existing forms to suit their needs or create new ones. This is because forms are used to collect essential data, and deleting them could result in the loss of valuable information.

As with any new feature, we understand there may be some learning curves and potential areas for improvement. That’s why we welcome any feedback that you may have regarding your experience with Forms.

#Successful

The number of users who have passed the form according to the form requirements set. The number calculates the user’s last attempt. For example, if a user takes the form 3 times: Fail, Fail, Pass, the latest attempt will be recorded as Passed. A form-taker cannot go from “Successful” to “Failed” as the form does not allow users to change their answers once a form is passed

Standard Reports for Forms

Standardized reporting has been added for pre-test and post-test forms available within the Program Planner and Virtual Meeting to support both on-site and virtual attendees at hybrid meetings. Meeting administrators can quickly download the form results for any form on the Forms dashboard. Pre-test form reports will be helpful for presenters to gauge their audiences’ knowledge before the session. Post-test forms help assess the session and can be used for accreditation.

Standardized reporting has been added for pre-test and post-test forms available within the Program Planner and Virtual Meeting to support both on-site and virtual attendees at hybrid meetings.

Meeting administrators can quickly download the form results for any form on the Forms dashboard. Pre-test form reports will be helpful for presenters to gauge their audiences’ knowledge before the session. Post-test forms help assess the session and can be used for accreditation.

To view a form’s report:
1. Go to the Forms dashboard
2. Hover over the form and select the action “Reports”

3. There are currently three standardized reporting options:

Distribution: Ideal for pivot tables and Power BI because of its rectangular dataset. The download repeats the question for each answer. Distribution includes the Form Name, Each question, Each answer, the Correct answer, the Total number of form-takers, How many people selected each answer, and the Percent of each question selected divided by the total number of question-takers. Shown below:

Distribution Handout: Ideal for easy consumption as its layout is more like a traditional test. Presenters could be given a downloaded pre-test PDF to understand where to focus their attention in the session. Includes the same information as ‘Distribution’. Shown below:

Selection Raw: Includes a time stamp for each individual Person Key, Form Key, how each question was answered, and the correct answers.

4. Optionally export the form as an HTML, XSLX, or PDF file by clicking one of the links in the upper left-hand corner:

Clone Pre/Post-test Forms

Pre-Tests and Post-Tests are available within the Program Planner and Virtual Meeting to support both on-site and virtual attendees at hybrid meetings. Admins can now “clone”/copy a pre-existing form into another pre-test or post-test, carrying over all the original form’s questions, answers, and settings. With this feature, you don’t need to build the same forms over and over.

Pre-Tests and Post-Tests are available within the Program Planner and Virtual Meeting to support both on-site and virtual attendees at hybrid meetings. Admins can now “clone”/copy a pre-existing form into another pre-test or post-test, carrying over all the original form’s questions, answers, and settings. With this feature, you don’t need to build the same forms over and over.

View the video below to learn how to clone a form:

Pre-test & Post-tests Form Builder & Assigning to Sessions

Pre-test and Post-test Forms feature a question builder that administrative users will find under the cAdmin navigation item called “Forms > Pre/Post test forms”. The Forms dashboard allows administrators to manage Forms that have already been created, report on data collected in Forms, and create new forms using “drag & drop” Form builder functions. The new feature allows pre-test and post-test forms to be used for sessions in cAttendee and PP8. Attendees attending a meeting will be able to take pre-tests and post-tests based on configured availability date/times (e.g., before a session) and configured registration limits (e.g., registration codes, ticketed sessions).

Pre-test and Post-test Forms feature a question builder that administrative users will find under the cAdmin navigation item called “Forms > Pre/Post test forms”. The Forms dashboard allows administrators to manage Forms that have already been created, report on data collected in Forms, and create new forms using “drag & drop” Form builder functions.

The new feature allows pre-test and post-test forms to be used for sessions in cAttendee and PP8 (Program Planner). Attendees attending a meeting will be able to take pre-tests and post-tests based on configured availability date/times (e.g., before a session) and configured registration limits (e.g., registration codes, ticketed sessions). These forms are fully customizable by administrators as well as reporting.

To create a pre-test form:
1. Go to Forms -> Pre/Post test forms
2. Click “Add form” and select “Session pre test”
3. The “Name” is the internal name (e.g., Session 199 Pre-test). The “Display Name” is the name attendees will see (e.g., Pre-test). Click “Add”
4. Find the pre-test Name, and on the right under “Actions,” click “Edit form” to create the pre-test. Use the How-to’s on the left side of the page to help set up the questions and formatting
5. Go to the Sessions dashboard
6. Select the session details you’d like to add a pre-test
7. Select “Add Form” under Pre-test forms
– Select the Form Name
– Optionally add Reg Code(s), so only those attendees with the Reg Code(s) see the form with no spaces separated by commas (e.g., NURSE,888,111)
– Select an Open date either with a preset or a “Custom time” for when an attendee is allowed to take the pre-test
– Select a Close date either with preset or a “Custom time” for when the pre-test will become unavailable

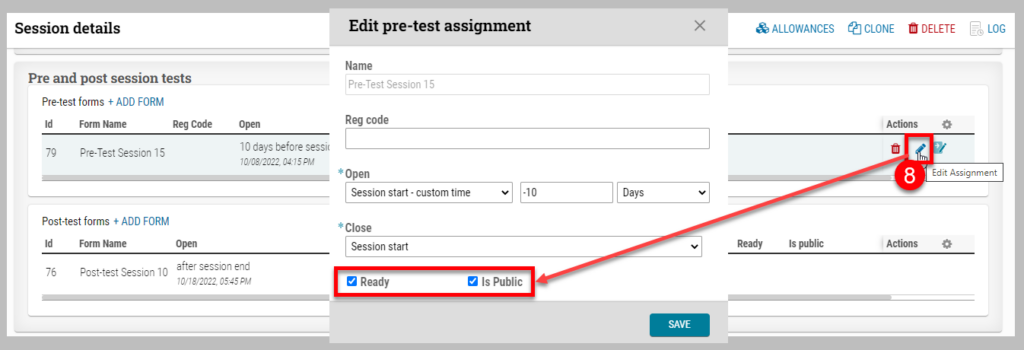
8. When the form is complete, we want to check the two flags “Ready” and “Is Public” to activate the test by clicking the “Edit” action. Make sure the test is completely set up correctly before checking the flags, as once it is public, it will negatively affect the results. To edit the pre-test again, click the “Edit” icon and unselect the two boxes


Creating a post-test form is similar to a pre-test form with an optional pre-test dependency mentioned in step 4:
1. Go to Forms -> Pre/Post test forms
2. Click “Add form” and select “Session post test”
3. The “Name” is the internal name (e.g., Session 199 Post-test). The “Display Name” is the name attendees will see (e.g., Post-test)
4. Select a “Dependent form” if you would like the attendee to either:
– Successfully take a pre-test before taking the post-test
– Complete a numeric score above a certain number (e.g., Value = 7) before taking the post-test. For example, there are 10 questions. If an administrator sets the “Value” number at 7, it means the attendee must score an 8 or higher on the pre-test in order to take the post-test
– Complete a numeric score below a certain number before taking the post-test. With the example above, the attendee must score a 6 or lower in order to take the post-test.
5. Find the post-test Name, and on the right under “Actions,” click “Edit form” to create the post-test. Use the How-to’s on the left side of the page to help set up the questions and formatting
6. Go to the Sessions dashboard
7. Select a session details
8. Select “Add Form” under Post-test forms
– Select the Form Name
– Optionally add Reg Code(s), so only those attendees with the Reg Code(s) see the form with no spaces separated by commas (e.g., NURSE,888,111)
– Select an Open date either with a preset or a “Custom time” for when an attendee is allowed to take the post-test
– Select a Close date either with preset or a “Custom time” for when the post-test will become unavailable

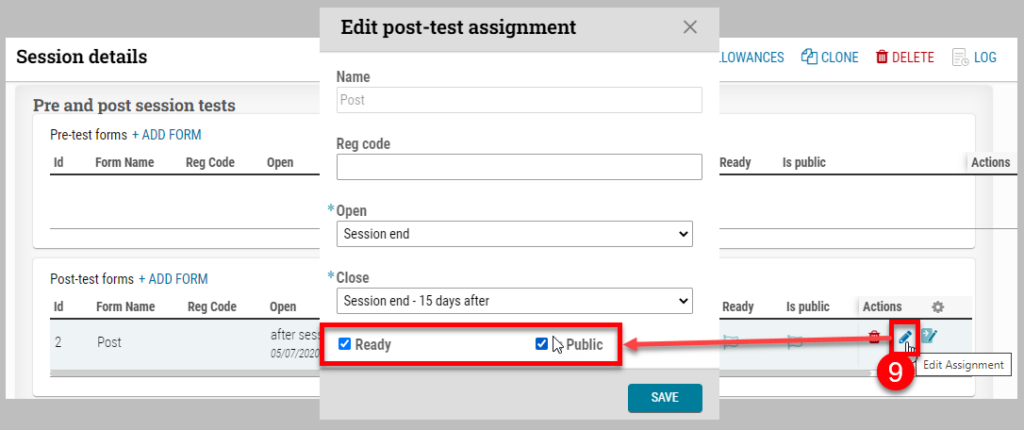
9. When the form is complete, we want to check the two flags “Ready” and “Is Public” to activate the test by clicking the “Edit” action. Make sure the test is completely set up correctly before checking the flags, as once it is public, it will negatively affect the results. To edit the post-test again, click the “Edit” icon and unselect the two boxes

Click to access the login or register cheese