1 – New Portal Configurations

As a meeting organizer or configuration analyst, I frequently use cAdmin to adjust various settings within the Portal, including navigation labels, meeting details, directions, links, images, and the visibility of activities tailored to specific user personas. Previously, this task was more time-consuming due to the presence of many hidden options. However, with our latest release in May 2024, we’ve streamlined the process, significantly enhancing user-friendliness for administrators.

As a meeting organizer or configuration analyst, I frequently use cAdmin to adjust various settings within the Portal, including navigation labels, meeting details, directions, links, images, and the visibility of activities tailored to specific user personas. Previously, this task was more time-consuming due to the amount of options. However, with our latest release, we’ve streamlined the process, significantly enhancing user-friendliness for administrators.

New Portal Configurations Location in cAdmin

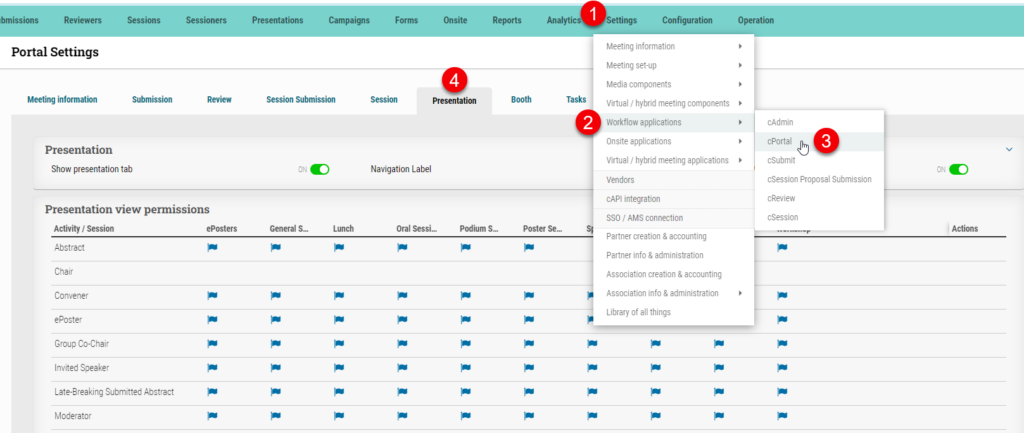
The configuration interface is organized under Settings > Workflow applications > cPortal, mirroring the layout of the Portal itself.

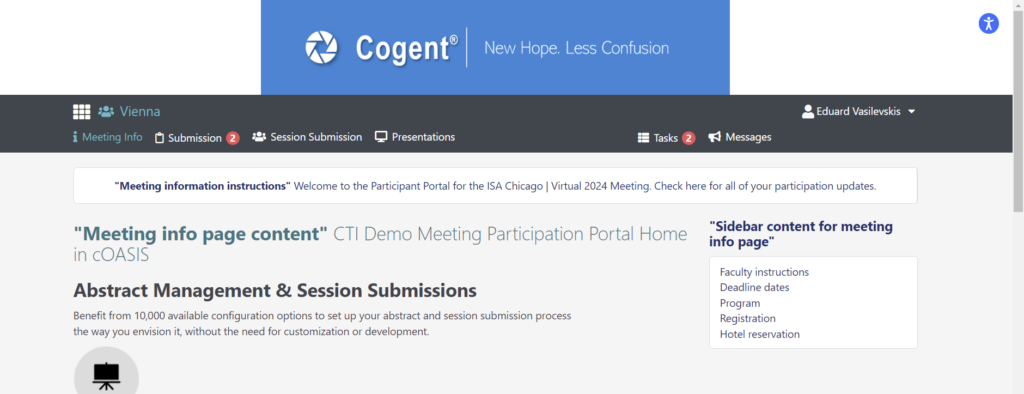
• The Meeting information tab serves as the homepage for the meeting Portal, with each field corresponding to a section on the Portal’s homepage. For instance, the Navigation label represents the tab name, and below are the Meeting information instructions, Meeting info page content, and Sidebar content for meeting info page.
New Listing Template Fields for Portal Presentations, Tasks and Messages in Portal (dashblocktemplate)

Header text format example for cAdmin:

<header>#$$SessionNumber$$ - $$SessionTitle$$</header>

Field text format example for cAdmin:

<property><propertyTitle>Session Date: </propertyTitle><propertyValue>$$SessionDate$$</propertyValue></property>

New fields:
• Session # and Title – $$SessionNumber$$ – $$SessionTitle$$
• Session Date – $$SessionDate$$
• Session Start – Session End Time – $$SessionStart$$ – $$SessionEnd$$
• Session Location – $$SessionLocation$$
• Session Role Start & End Times – $$SessionRoleStart$$ – $$SessionRoleEnd$$
• Presentation Duration – $$PresentationDuration$$
• Presentation Number – $$PresentationNumber$$
• Poster Board Number – $$PosterboardNumber$$
• Control-level Topic1 – $$ControlTopic$$
• Author Block – $$PresentationBlock$$
• Disclosure Block – $$DislcosureBlock$$
• Primary Author Name – $$PresentingAuthor$$
• Submission Topic – TBD

Other currently available fields:
$$ControlNumber$$
$$FullControlNumber$$
$$PublishingTitle$$
$$CompleteStatus$$
$$ProgramStatus$$
$$ActivityName$$
$$SessionNumber$$
$$SessionTitle$$
$$SessionID$$
$$SessionRoleStatus$$
$$SessionLocation$$
$$SessionStart$$
$$SessionEnd$$
$$SessionRoleStart$$
$$SessionRoleEnd$$
$$PresentationDuration$$

Configuring Listing Template Portal Fields

1. Navigate to Settings > Workflow Applications > cPortal. Then, select the tab you wish to modify the display fields for, such as Presentations.
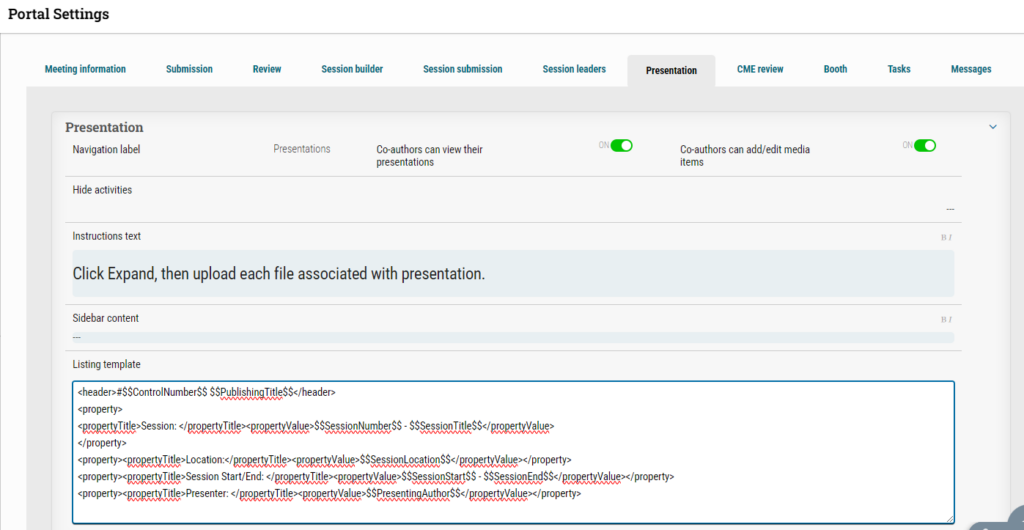
2. Locate the Listing template and input the desired Option Value:

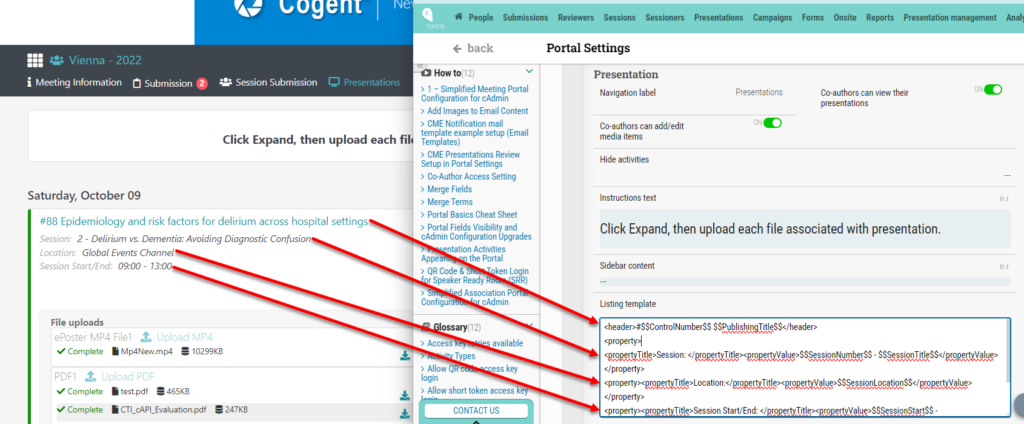
<header>#$$ControlNumber$$ $$PublishingTitle$$</header>
<property>
<propertyTitle>Session: </propertyTitle><propertyValue>$$SessionNumber$$ - $$SessionTitle$$</propertyValue>
</property>
<property><propertyTitle>Location:</propertyTitle><propertyValue>$$SessionLocation$$</propertyValue></property>
<property><propertyTitle>Session Start/End: </propertyTitle><propertyValue>$$SessionStart$$ - $$SessionEnd$$</propertyValue></property>
Try It Yourself

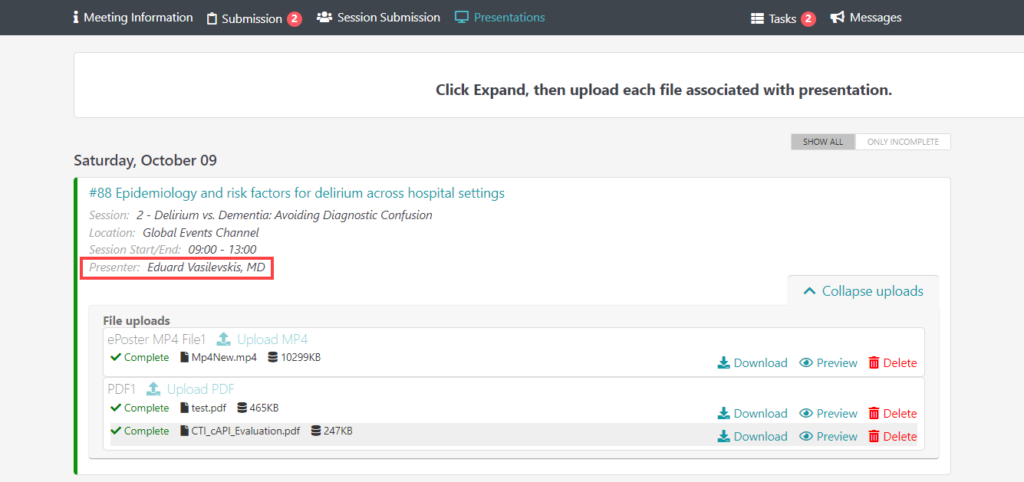
For other cAdmin fields listed above, copy and paste one of the lines of code and replace the two field values with the appropriate placeholders, such as “Presenter:” for the label and “$$PresentingAuthor$$” to pull the cAdmin field:

<property><propertyTitle>Presenter: </propertyTitle><propertyValue>$$PresentingAuthor$$</propertyValue></property>
Old Site Config vs. New Portal Settings

For those familiar with the old configuration method, you’ll find all the updated Portal configurations listed in the table. If users try accessing the old Site Configurations from their prior location and click the Option Name link, they’ll be redirected to the new Portal Settings configuration page. However, it will only direct you to the first tab, irrespective of your original tab within Portal Settings, necessitating an additional click.

A configuration NOT listed in the table below is still accessible under Configurations > Site configurations.

Verify Staff Roles

To access the Site configurations page, cAdmin users must hold at least one of the specified staff roles:
• Association Administrator
• Association Team Leader
• Distributor Administrator
• Distributor Team Leader

Users with these roles in cAdmin can verify their own or others’ roles within their association by navigating to Settings > Association info & administration > Staff accounts.

Advanced Configuration Note

Starting May 2024, if you plan to apply an activity qualifier to any tab on the Portal, you must currently use the old configuration method in Site Configurations. This qualifier will overwrite the new field labels in the Portal Settings.

Portal Settings TabOld Site Configuration Category and NameNew field label
Meeting informationADMIN / DashModuleDisplayName_MeetinginfoNavigation label
ADMIN / MeetingHeaderBackgroundColorPortal header background color (meeting level)
ADMIN / DashHideDisclosureLinkHide the centralized disclosure link in the portal homepage
ADMIN / DashSiteHeaderImagePortal header image URL (meeting level)
ADMIN / DashMsgText_MeetingInfoMeeting information instructions
ADMIN / DashMeetingInfoMainContentTextMeeting info page content
ADMIN / DashRightNavText_MeetingInfoSidebar content for meeting info page
SubmissionSUBMIT / DashModuleDisplayNameNavigation label
SUBMIT / DashHideGraphsHide summary graphs
SUBMIT / DashChartEntityNameTop-chart- label of completion status
SUBMIT / DashHideDisclosureLinkHide the centralized disclosure link in the submissions page
SUBMIT / DashExcludeDisclosureCheckForActivitiesCentralized disclosure NOT mandatory for these activities
SUBMIT / BlockActivityDisplayHide activities
SUBMIT / DashMsgTextInstructions text
SUBMIT / DashRightNavTextSidebar content
SUBMIT / DashBlockTemplateListing template
Abstract ReviewREVIEW / DashModuleDisplayNameNavigation label
REVIEW / DashHideGraphsHide summary graphs
REVIEW / DashChartEntityNameTop-chart- label of completion status
REVIEW / DashHideDisclosureLinkHide the centralized disclosure link in the review page
REVIEW / DashExcludeDisclosureCheckForActivitiesCentralized disclosure NOT mandatory for these activities
REVIEW / DashMsgTextInstructions text
REVIEW / DashRightNavTextSidebar content
REVIEW / DashBlockTemplateListing template
Session builderSESSIONS / DashModuleDisplayNameNavigation label
SESSIONS / DashHideGraphsHide summary graphs
SESSIONS / DashChartEntityNameTop-chart- label of completion status
SESSIONS / DashHideDisclosureLinkHide the centralized disclosure link in the sessions submissions page
SESSIONS / DashExcludeDisclosureCheckForSessionTypesCentralized disclosure NOT mandatory for these session types
SESSIONS / DashMsgTextInstructions text
SESSIONS / DashRightNavTextSidebar content
SESSIONS / DashBlockTemplateListing template
Session submissionSUGGESTEDSESSIONS / DashModuleDisplayNameNavigation label
SUGGESTEDSESSIONS / DashHideGraphsHide summary graphs
SUGGESTEDSESSIONS / DashChartEntityNameTop-chart- label of completion status
SUGGESTEDSESSIONS / DashHideDisclosureLinkHide the centralized disclosure link in the sessions submissions page
SUGGESTEDSESSIONS / DashExcludeDisclosureCheckForSessionTypesCentralized disclosure NOT mandatory for these session types
SUGGESTEDSESSIONS / DashMsgTextInstructions text
SUGGESTEDSESSIONS / DashRightNavTextSidebar content
SUGGESTEDSESSIONS / DashBlockTemplateListing template
Session leadersPortal setting for session leaders remains unchanged. Previously configurable here.
PresentationSUBMIT / DashModuleDisplayName_PresentationNavigation label
SUBMIT / BlockActivityDisplay_PresentationHide activities
SUBMIT / DashMsgText_PresentationInstructions text
SUBMIT / DashRightNavText_PresentationSidebar content
SUBMIT / DashBlockTemplate_PresentationListing template
CME reviewPortal setting for CME review remains unchanged. Previously configurable here.
BoothBooth remains unchanged. Previously configurable here.
Notification – TasksNOTIFICATION / DashModuleDisplayName_TasksNavigation label
NOTIFICATIONS / DashChartEntityName_TasksTop-chart-label of completion status
NOTIFICATION / DashHideGraphsHide summary graphs (shared with Messages)
NOTIFICATION / DashHideDisclosureLink_TasksHide the centralized disclosure link in the tasks page
NOTIFICATION / DashMsgText_TasksInstructions text (top of page)
NOTIFICATION / DashRightNavText_TasksSidebar content
NOTIFICATION / DashBlockTemplate_TasksListing template
Notification – MessagesNOTIFICATION / DashModuleDisplayName_MessagesNavigation label
NOTIFICATIONS / DashChartEntityName_MessagesTop-chart-label of completion status
NOTIFICATION / DashHideGraphsHide summary graphs (shared with Tasks)
NOTIFICATION / DashHideDisclosureLink_MessagesHide the centralized disclosure link in the messages page
NOTIFICATION / DashMsgText_MessagesInstructions text
NOTIFICATION / DashRightNavText_MessagesSidebar content
NOTIFICATION / DashBlockTemplate_MessagesListing template

Field labels such as “Allow QR code access key login” can be found in the Glossary on the left side of the Portal Settings page.

Save Configurations in the Library for Later Use

To save configurations for future use, especially around meeting deadlines or future meetings, follow these steps:

1. Copy the appropriate old configuration name from the chart above that matches the new Portal name.
2. Navigate to Configuration -> Site configuration.
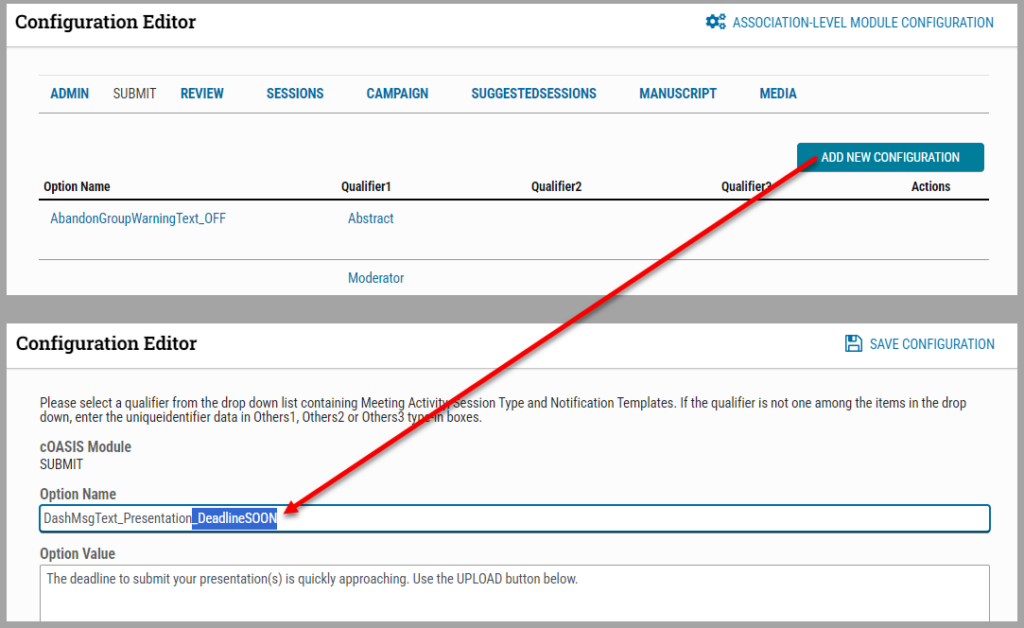
3. Select the correct tab (e.g., SUBMIT). Click on ADD NEW CONFIGURATION.
4. Paste the old configuration name (e.g., DashMsgText_Presentation_DeadlineSOON).
5. In this example, the suffix “_DeadlineSOON” will save this configuration in the library, allowing you to copy and paste it later during the meeting.
Simplified Association Portal Configuration for cAdmin 

As a meeting organizer or configuration analyst, I frequently use cAdmin to adjust various settings within the Portal, including navigation labels, meeting details, directions, links, images, and the visibility of activities tailored to specific user personas. Previously, this task was more time-consuming due to the amount of options. However, with our latest release in May 2024, we’ve streamlined the process, significantly enhancing user-friendliness for administrators.

The Portal Association configuration interface is organized under Settings > Association info & administration > Association information > cPortal, mirroring the layout of the Association Portal itself.

Below, you’ll find all the updated Association Portal configurations listed in the table. An association Portal configuration NOT listed in the table below is still accessible under Configurations > Site configurations > Association-Level Module Configuration Editor. Remember that only users with the roles of Distributor Admin, Distributor Team Leader, Association Admin, and Association Team Leaders can access and view the previous configurations menu.

For those familiar with the old method, the table below displays the former configuration category and option name alongside its corresponding new term and location within cAdmin.

Site SettingsOld Site Configuration Category and NameNew field label
cPortal Base settings DASHBOARD / SiteHeaderImagePortal header image URL (association level)
DASHBOARD / SiteHeaderBackgroundColorPortal header background color (association level)
DASHBOARD/LoginWelcomeTextLogin welcome text
DASHBOARD / HomeMsgTextHomepage top (boxed) area content
DASHBOARD / HomeMainContentTextHomepage main content
DASHBOARD / HomeRightNavTextHomepage sidebar content
PORTAL / profile-page-instruction-textProfile page instructions text
cPortal security settings DASHBOARD / ExcludeMeetingsFromDashboardMeetings restricted to use the portal (comma separated meeting IDs)
DASHBOARD / SSOCloudWebserviceURLSSO client URL
DASHBOARD / SSOClaimsIdentityProviderSSO claims identity provider
DASHBOARD / SSOLogoutURLSSO logout URL
DASHBOARD / BlockCreateAccountDo not allow creation of new accounts
DASHBOARD / EmailNewAccountFromTextEmail From field – for new account created
DASHBOARD / EmailNewAccountSubjectEmail Subject field – for new account created
DASHBOARD / EmailNewAccountBodyEmail body – for new account created

(Updated) COI/CME Presentation Review Process

Updated April 8, 2024: The optional configuring section, ‘Assign CME Reviewers in Bulk by Session Type,’ has been added to the documentation. Ensure educational and scientific content is unbiased and free from conflicts of interest. Follow ACCME and ECME guidelines to mitigate conflicts of interest among speakers. Use CTI’s CME Presentation Review feature to facilitate compliance.

Updated April 8, 2024: The optional configuring section, ‘Assign CME Reviewers in Bulk by Session Type,’ has been added to the documentation.

Ensure educational and scientific content is unbiased and free from conflicts of interest. Follow ACCME and ECME guidelines to mitigate conflicts of interest among speakers. Use CTI’s CME Presentation Review feature to facilitate compliance.

Assign a COI/CME Reviewer role in cOASIS to assess content, classify it as compliant or non-compliant, notify speakers of any issues, allow for mitigation, and track progress. Conduct reviews before and during the meeting via cAdmin tools.

Access the full documentation, FAQs, configuration, and operational checklists at the document’s end (page 19) for implementation details.

Presentation Management Checklist v1.2

This checklist provides a detailed guide for meeting and client setup using cOASIS. It covers determining customer status, creating meeting contracts, session types, activities, locations, and sandbox testing.

This checklist provides a detailed guide for meeting and client setup using cOASIS. It covers determining customer status, creating meeting contracts, session types, activities, locations, and sandbox testing. The checklist includes:
– Media type and template creation
– Automation flags
– Configuring presentation portals
– Campaigns for presenters
– Setting up Speaker Ready Rooms (SRR).

It also includes server setup, pre-event testing, and onsite operational checklists for daily use, including syncing presentations, quality checks, and assisting speakers with navigation.

Co-Author Access Setting

Maybe you want to restrict access to content. We’ve added a setting to control whether co-authors can view Portal presentations. Just turn their access on or off with an easy toggle in cPortal Settings.

We’ve added a setting to control whether co-authors can view or edit Portal presentations. Just turn their access on or off with an easy toggle in cPortal Settings.

1. Go to Settings -> Workflow applications -> cPortal -> click the Presentation tab
2. Check ON to give all co-authors permission to View, Add/Edit, or both presentations on the Portal

Media Upload Completion Status

CTI has implemented a new process to store media upload completion status on the Presentations dashboard allowing administrators to quickly use the Advanced Search function to view Completed or Incomplete presentations. When a presenter finishes the uploading presentation(s) process to their Portal, the Presentations dashboard field “Completion status” in cAdmin will turn “Complete.”

CTI has a process to store media upload completion status on the Presentations dashboard allowing administrators to quickly use the Advanced Search function to view Completed or Incomplete presentations. When a presenter finishes the uploading presentation(s) process to their Portal, the Presentations dashboard field “Completion status” in cAdmin will turn “Complete.”

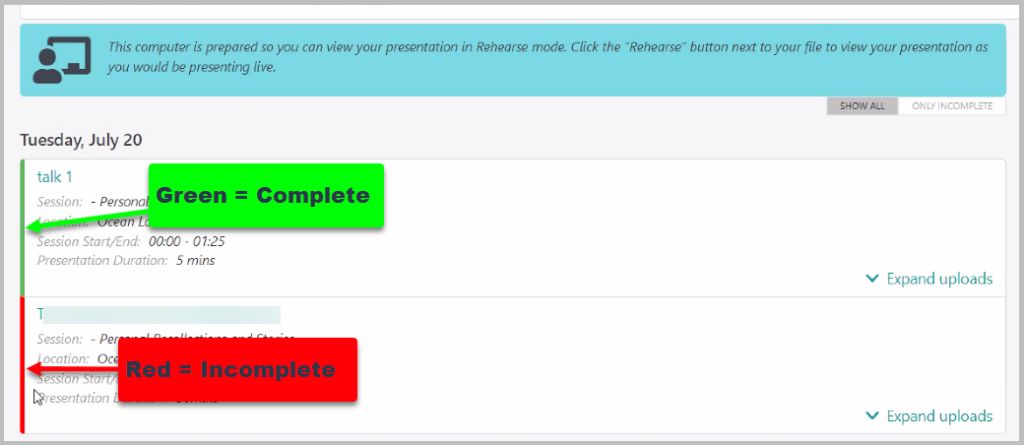
Uploaders in Portal will see green and red indicators that presentation upload(s) are either complete or incomplete, shown below:

Uploaders clicking “Only Incomplete” in the top right corner to show only incomplete presentations below:

Presentation Activities Appearing on the Portal

Administrators can control which presentations appear on the Portal, where presenters and co-authors can upload, edit, and preview their content.

Administrators can control which presentations appear on the Portal, where presenters and co-authors can upload, edit, and preview their content. Administrators control the Portal presentation content under:
1. cAdmin > Settings
2. Workflow Applications
3. cPortal
4. Presentation

An administrator can hide the presentation tab altogether in the Portal by switching the “Show presentation tab” to OFF. An administrator can also allow co-authors to upload, edit, and preview presentations in Portal by selecting “Co-authors can add/edit media items” to ON.

Activity types are vertical (e.g., Abstract, Chair, Convener), and Session types are horizontal (e.g., ePosters, Lunch, Oral Session). Selecting the flag blue corresponds to the matrix of activity type and session type presentations to be made visible on the Portal. Presentations will not be visible on Portal if the activity and session type flag is not selected. An administrator can save time by selecting all or deselecting all the flags in a row under Actions at the end of the row.

How to set Instructions with Custom Terms Agent running Portal Session Room Preview button

Use the following method to set the presentation Portal instructions for the speaker ready room which includes the Session Room Preview button so presenters can view their presentations like they will be seen by attendees.

Use the following method to set the presentation Portal instructions for the speaker ready room which includes the Session Room Preview button so presenters can view their presentations like they will be seen by attendees.

1. Go to Settings > Blocks and terms
2. Under System Terms, search Group Name “portal” and Term Name “agent”

3. Under “Association Override,” enter the instructional text you would like to see in the blue box on Portal. We do have a default text, but anything entered into Association Override will override the default value

4. Make sure the Agent is downloaded to the computer that you will be using. To find the download, search the Knowledge Base for “agent download”
5. Go to Portal > Presentations to view the instructions in the blue box

Windows Portal Agent Download

To complete the setup of all computers for the Speaker Ready Room (SRR), an administrator needs to set up the Portal Agent on each onsite computer. Click the link below to download and follow the directions.

To complete the setup of all computers for the Speaker Ready Room (SRR), an administrator needs to set up the Portal Agent on each onsite computer. Click the link below to download and follow the directions.

Download Windows Agent v. 21.8.2.0

1. Download 
2. Click the download to run
– Might have to click “More info” and select “Run anyway”
3. Click all “Next” and “I agree” 
4. Set Presenter View if needed by clicking on the PowerPoint monitor settings 
– Choose Presenter monitor 
– Choose Presentation monitor 
– Set resolution

Expand Person Merge to include SSOID at author level and Photo/Bio

An association management system based single sign-on system (SSO), where the association is a “source of truth” for a person and all related personally identifiable information (PII) is the only GDPR approved pattern for identity management, and fortunately, a pattern that the cOASIS platform fully supports. The components include:

Proper submitter, co-author, presenter & speaker identity management results in delighted end-users and smoothly operating support teams. Improper identity management results in frustrated submitters, co-authors, presenters & speakers, as well as chaotic scrambles to clean things up. We would wish for proper identity management always. Still, since even Association Management Systems (AMS) and their related services can have off days or be misconfigured, we’ve added an additional tool to help clean up the “mess on aisle 5” if it happens.

An association management system based single sign-on system (SSO), where the association is a “source of truth” for a person and all related personally identifiable information (PII) is the only GDPR approved pattern for identity management, and fortunately, a pattern that the cOASIS platform fully supports. The components include:

1) Logging into cPortal through the association’s SSO, which transfers the association’s member identity key (which we call the SSOID) to cOASIS;
2) Co-author look-up against the AMS during abstract submission, resulting in either a) a record already in the association’s AMS with the co-author’s member identity key (which is sometimes referred to as the AuthorMemberSpec, and is again the SSOID) or b) a co-author not being found, which is often configured to then allow the submitter to enter the co-author details, after which cOASIS assigns a temporary identity to the co-author;
3) A call back to the association’s AMS to resolve any temporary co-authors that have been entered manually by the submitter and update the record with the “permanent” AMS identity key for that person.

The update being made to the existing People dashboard -> Compare & Merge function contains two parts:

1. It allows cAdmin users to override the 3rd step in a properly functioning identity management process and force a Person SSOID into a co-author’s SSOID AuthorMemberSpec during a merge. This new function should not be needed, but it is now there if it is needed to help clean up a mess.
2. Photos and Bios will now merge when two Person-level records are merged according to the following rules for the “surviving Person record” and the “merged Person record”.
– If the merged Person record has a photo and/or bio AND the surviving Person record does not have a photo and/or bio, the photo and/or bio from the merged Person record will replace the blank(s) in the surviving Person record
– If the merged Person record contains a photo and/or bio AND the surviving Person record also contains a photo and/or bio, a message will be provided notifying the admin user that the surviving Person records already has one or more of these assets, allowing the user to cancel the merge and visually compare the results to determine which one to keep. If the merge is continued, the merged Person’s photo and/or bio will be removed.

Click to access the login or register cheese