1. Duplicate Account Report Best Practices

To efficiently address duplicate accounts in the People dashboard, it is recommended to follow these best practices. The first five reports listed on the Duplicate Account Report page in cAdmin are at the Association level, while the last six reports focus on gathering people data for the current meeting.

Best Practices
To efficiently address duplicate accounts in the People dashboard, it is recommended to follow these best practices. The first five reports listed on the Duplicate Account Report page in cAdmin are at the Association level, while the last six reports focus on gathering people data for the current meeting.

Download the reports in this order for the best duplicate account detection practices:
1) Duplicate on SSO ID: Start by examining accounts with duplicate Single Sign-On (SSO) IDs. SSO IDs should always be unique, so any duplicates indicate the presence of the same person. Merge these duplicate accounts. Note that you may need to scroll past the accounts without an SSO ID to identify the ones that require merging.
2) Duplicate on First, Last, Email: If the first name, last name, and email address match exactly, it signals that the accounts belong to the same individual.
3) Duplicate on Last, Email: This report helps identify individuals who may have different first names (e.g., Bob vs. Robert) but share the same last name and email address.
4) Duplicate on Email: By running this report, you can uncover individuals who have reversed their first and last names. It also helps identify groups of people who have been assigned to a single email address and need to be separated before merging them with their correct accounts.
5) Duplicate on First, Last: This report is helpful when an individual uses distinct email addresses for different purposes, such as personal and professional use—additionally, confirming the person’s identity as the same individual requires dependence on the client or end user.

Current Meeting Reports (Last 6):
When dealing with the current meeting, focus on the following report to address duplicate accounts effectively:
1) Duplicate on First, Last, Email of ANY controls: This report helps identify any duplicate accounts based on matching first names, last names, and email addresses, regardless of the specific controls involved.

To pull the Duplicate Account Reports:
1) Hover over the People tab and click “Duplicate Account Report.”
2) Select one of the best practice reports above.
3) Click “Get Information.” A CSV file with any duplicate information will download.


To resolve the duplicate(s), navigate to the People Dashboard and:
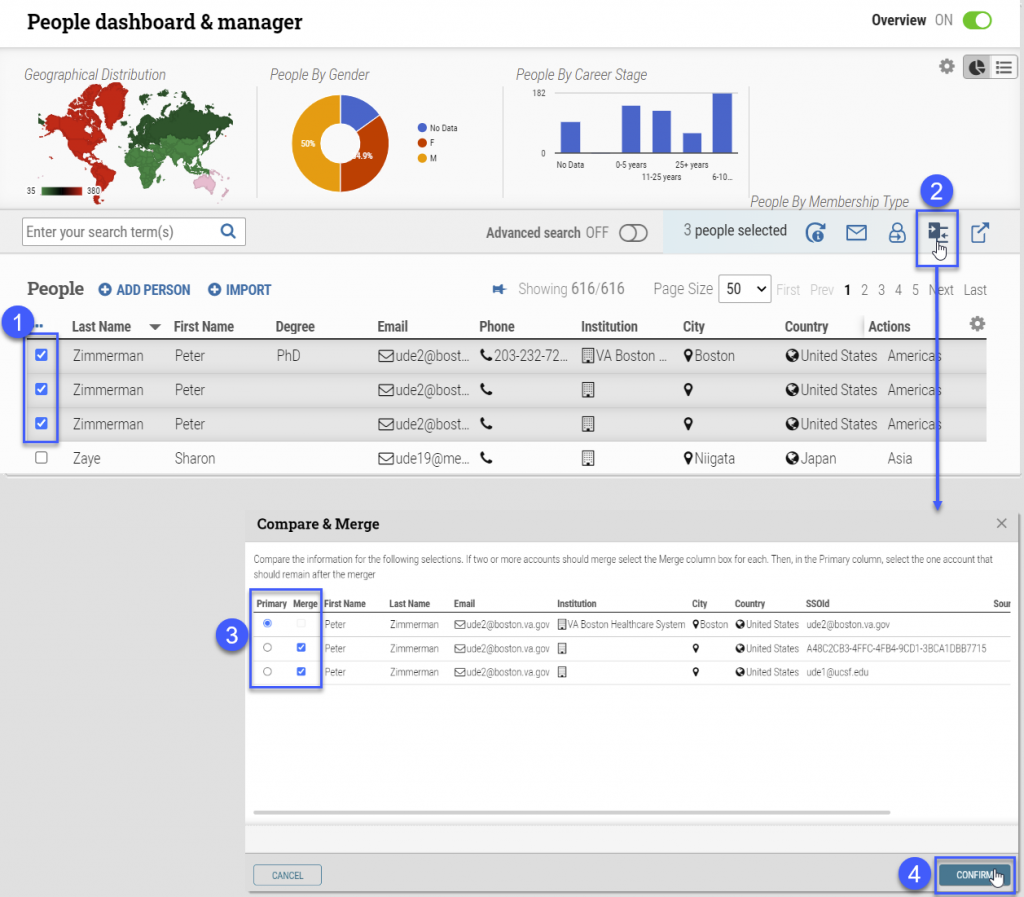
1) Select two or more boxes to the left of the duplicate person.
2) Use the Compare & Merge button in the upper right-hand corner of the screen.
3) Select one or more duplicates to “Merge,” and select one account (confirming the person’s identity as the same individual requires dependence on the client or end-user) to be the Primary. The merged account will retain all of the Primary account’s data.
For more training on duplicate account management, go to our client Trainual course.
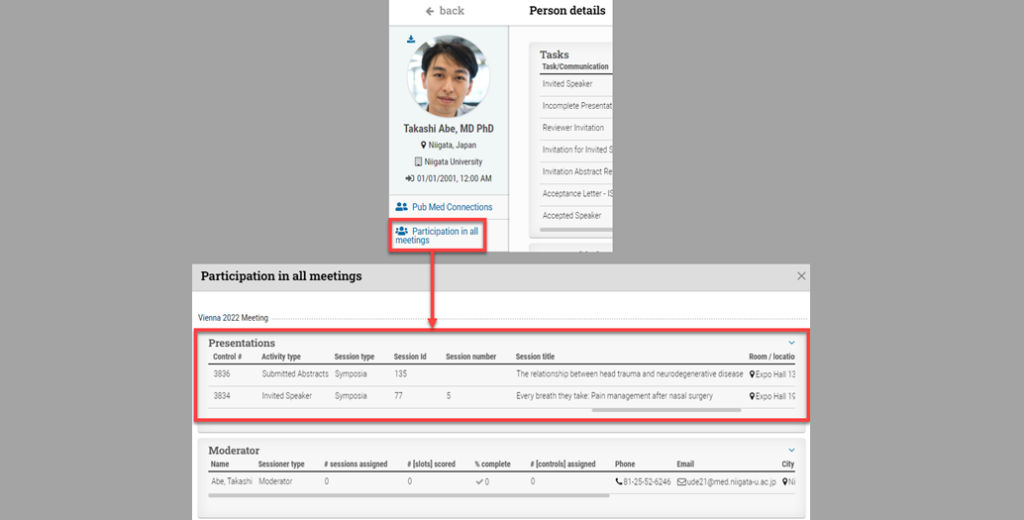
Presentations card in Person details

This feature gathers individual past meeting participation data for ALL of your cOASIS meetings. There is no need to log in to different events and past meetings within the association.

When you click the ‘Participation in all meetings’ button on the People details page, it will pull past meeting participation data, including presentations as far back as the data exists for your association in cOASIS.

This feature gathers individual past meeting participation data for ALL of your cOASIS meetings. There is no need to log in to different events and past meetings within the association.

Session Organizer

Administrators can view and edit a presentation to roles other than the presenter. Like a presenter, permitted roles can access the presentation through the Portal to check for quality control. Another level of edit permission enables them to make changes to the presentation as well.

Administrators can view and edit a presentation to roles other than the presenter. Like a presenter, permitted roles can access the presentation through the Portal to check for quality control. Another level of edit permission enables them to make changes to the presentation as well.  This functionality has been commonly requested by on-site presentation management customers and is beginning to be requested by customers organizing hybrid and virtual meetings as a tactic to reduce the cost of external A/V labor.

Download, Edit, and Upload Profile Picture

Some headshots need cropping so the head does not appear chopped off below the hairline. The source of these photos is not necessarily available unless they were initially uploaded by those seeking to edit them. Also, presenters can upload their headshots in the Portal but may later need assistance to crop them properly. With this update, any admin can download the original uploaded image to crop or enlarge as necessary. The download can be made by clicking the icon under the headshot, which will then open a page with the image from which a right-click on the image will allow download of the image to a local file.

Admin Set up Speaker Ready Room (SRR)

CTI has extensive experience with onsite Presentation Management and has provided tools for onsite staff to provide presenters and session leaders with secure, authorized access to their session presentations for review and editing. If participants enter the SRR having forgotten their passwords to access their presentations, SRR staff can check their identities and responsibilities on their Person details dashboards

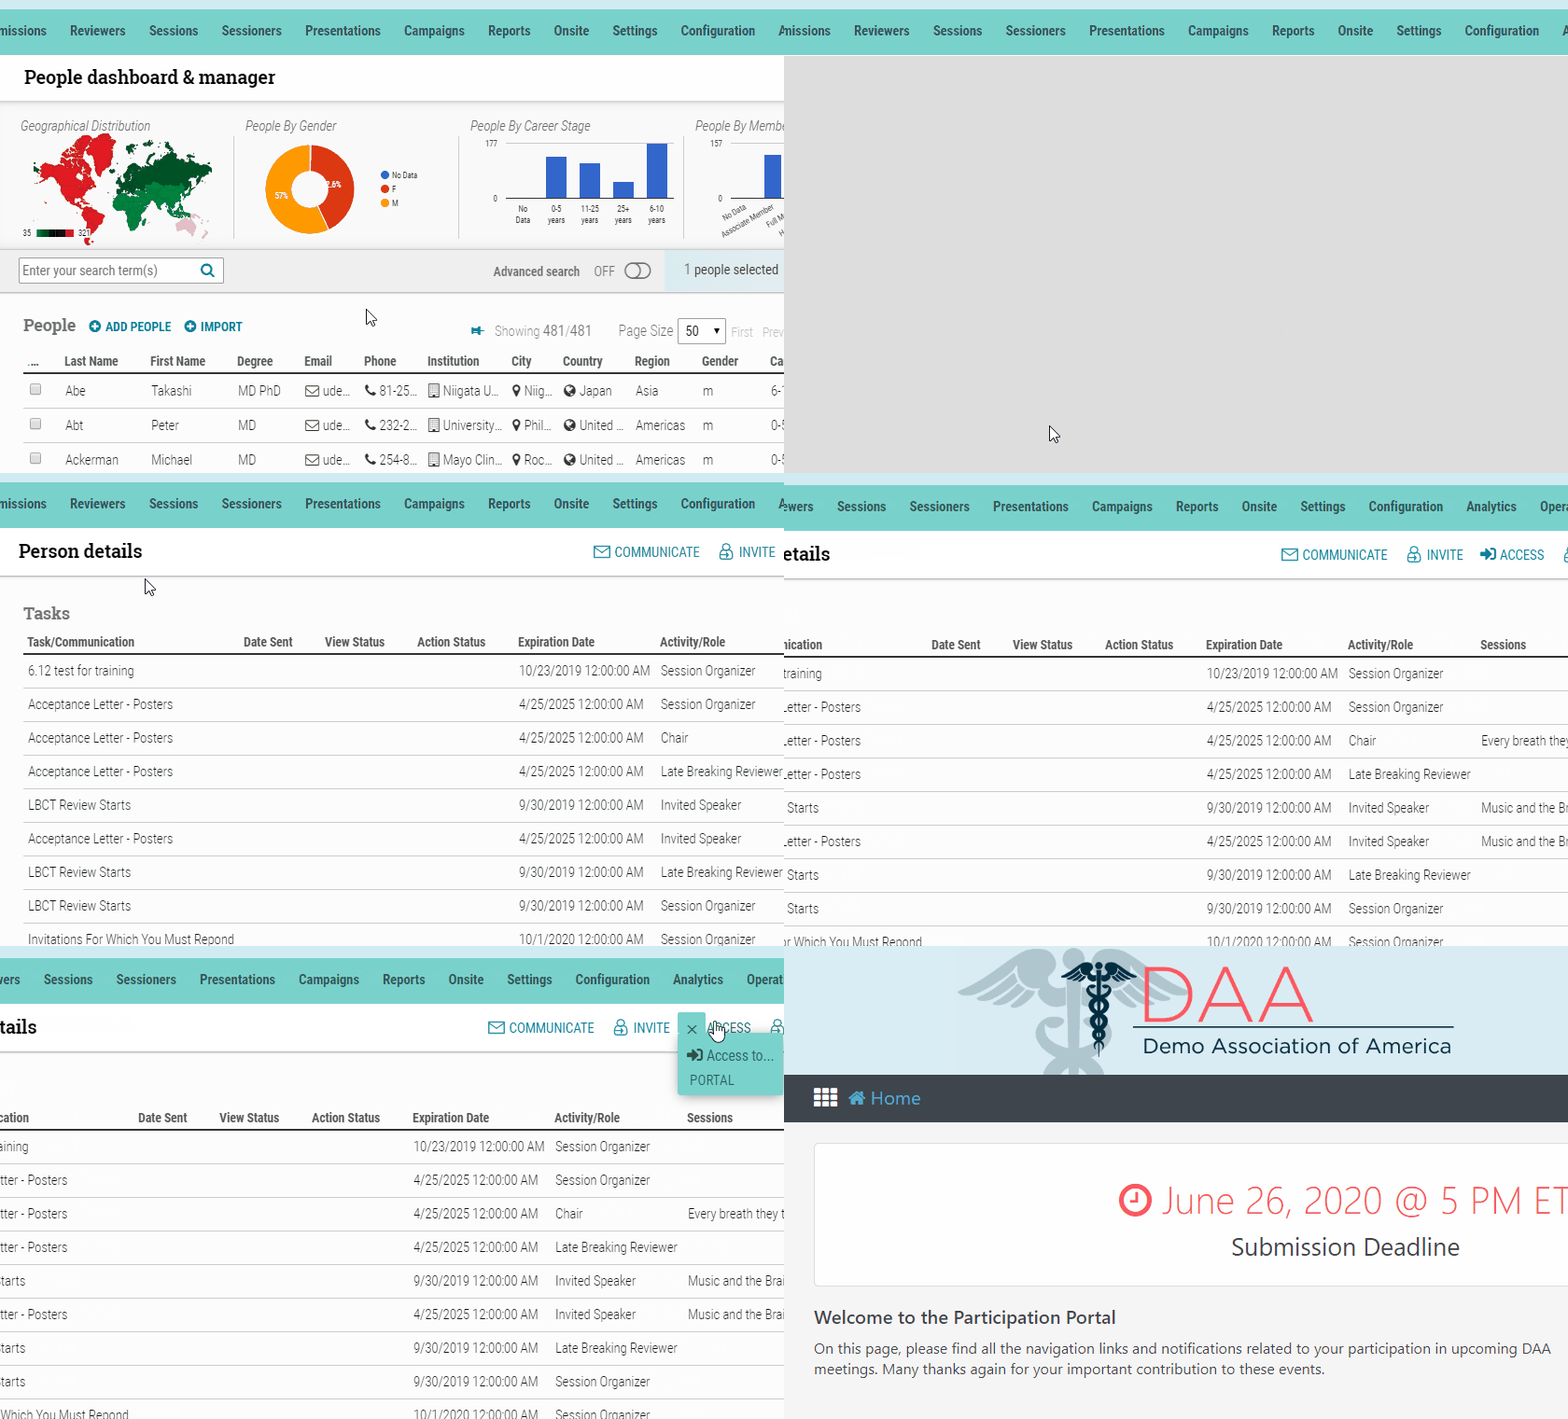
(1) They can click on the Access link (2) and pull down to Portal Access Pass. This will create a Quick login pass (3) with options for a scannable QR code or alphanumeric code for data entry (shown in the video above).

The pass can be delivered by the participants‘ email, so the QR code appears for scanning on their cell phones. It can also be printed out for scanners connected to the SRR laptops. Another option is for participants to scan the code on their cellphones with their laptop cameras. Administrative staff can select the SRR options and set an expiration date for the codes. 


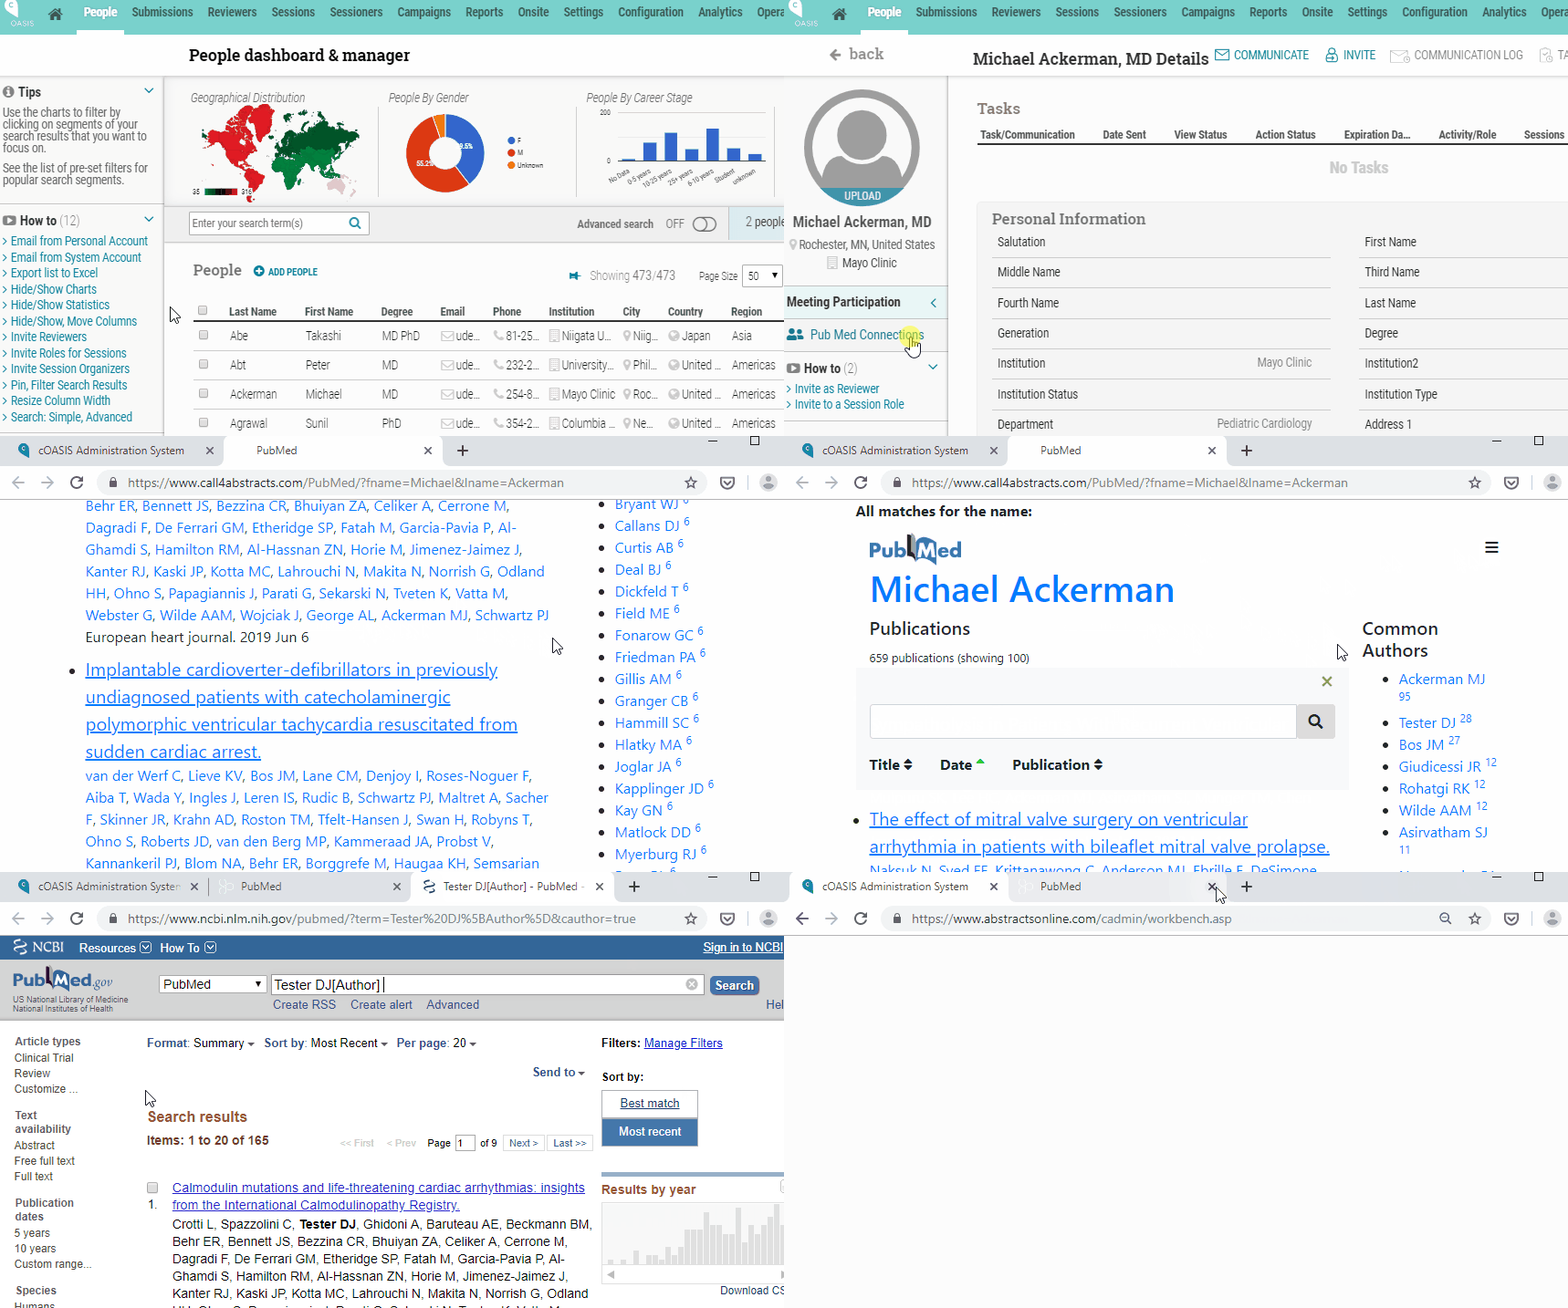
Update Past Meeting Participation icon on People Dashboard & Person Detail page.

• This gives admin users the option to update past meeting participation for the individuals of their choosing, either in bulk or individually.

On the People Dashboard, we’ve added a new bulk action icon that will allow you to update the past meeting participation information for the individuals you select. This can be done in bulk on the People Dashboard, or individually by clicking on the “Update Participation Info” on the top right corner of the Person Details page. This will pull past meeting participation data as far back as the data exists for your association in cOASIS. Using this new feature updates the past meeting participation for ALL of your cOASIS meetings, thus there is no need to run it for each individual meeting.

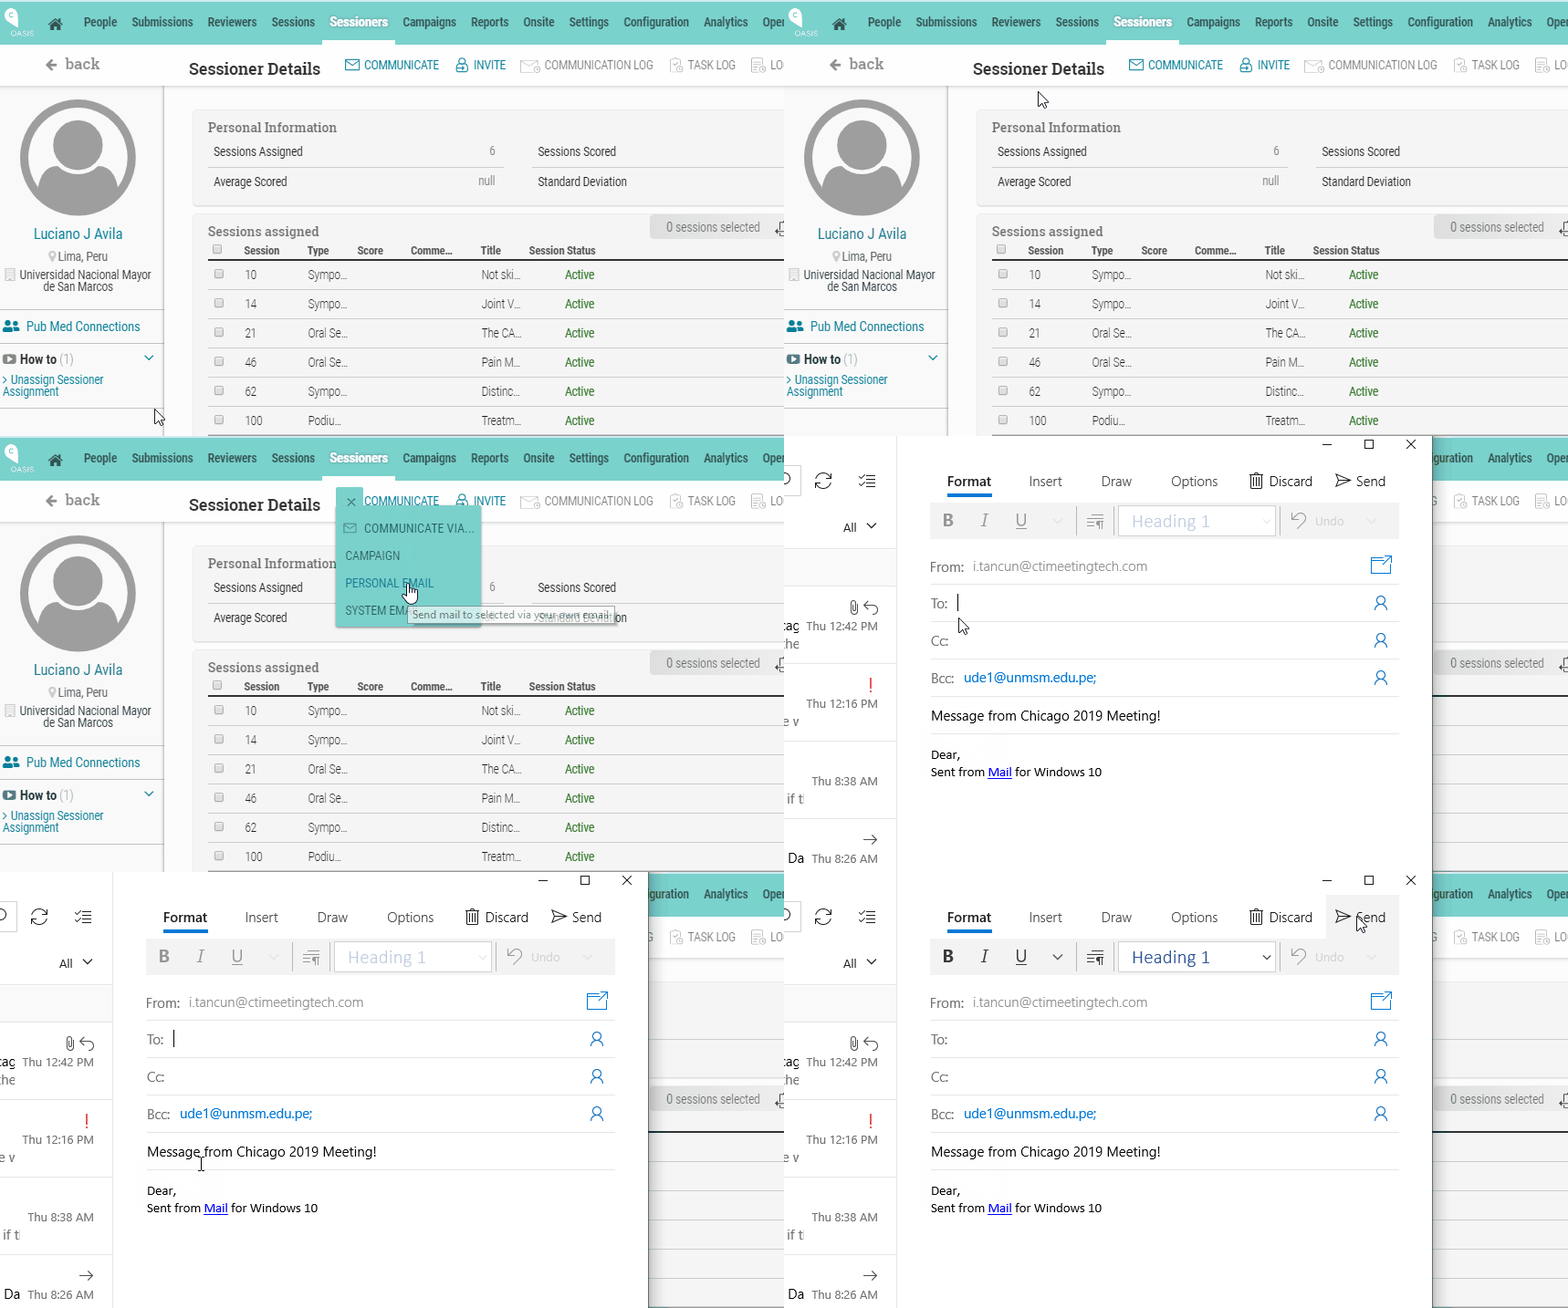
Text Editor on Campaigns, Session & Person Details pages

• New Text Editor on Campaigns, Session & Person Details pages simplify the editing/formatting of campaigns and other text.

We’ve added a new text editor on the Email Template and Landing Page edit screens under Campaign Recipients as well as in the larger text fields on the Session Details and Person Details pages. The new text editor automatically strips unnecessary HTML code when copying and pasting text in from Microsoft Word (or other documents). It also includes expanded rich text formatting icons to simplify the setting up/editing of campaigns, landing pages and other text.

Access Portal and Planner via Person Details page

• Administrators now have the option to login to the Program Planner and Participant Portal from an individual’s Person Details page.

From the Person Details page, administrators now have the option to login to the Program Planner and/or the Participant Portal as that specific user. This new function allows admin staff to “shadow” the end user and perform all available actions in the Portal and/or Program Planner. Any actions will be logged as “Administrator” actions.

Profile photo & biography upload via Participant Portal

• Meeting participants will now have the option to upload a profile photo & biography information through their portal profile page; photo and bio will automatically display in cOASIS with option to display in Program Planner.

For meeting participants using the Participant Portal, we added fields to the profile page which give participants the option to upload a profile photo and/or a brief biography. Photos and biography information entered will automatically update in their Person Detail page in cOASIS (as well as in the Program Planner, if those display settings are activated). Users are given the option to upload a photo from their PC, or via camera if accessing the site from a mobile device. Adding information in the Biography field ensures that it will appear with program profiles for any roles at this and future meetings.

Access Participation Portal to “Shadow” User

From the Person Details page, click on “Access” icon and select “Portal.” This gives the administrator the ability to log into the Participation Portal as that individual. This feature was formerly referred to as ‘Shadow Person.’

Explore self-service options through our introduction Trainual course.

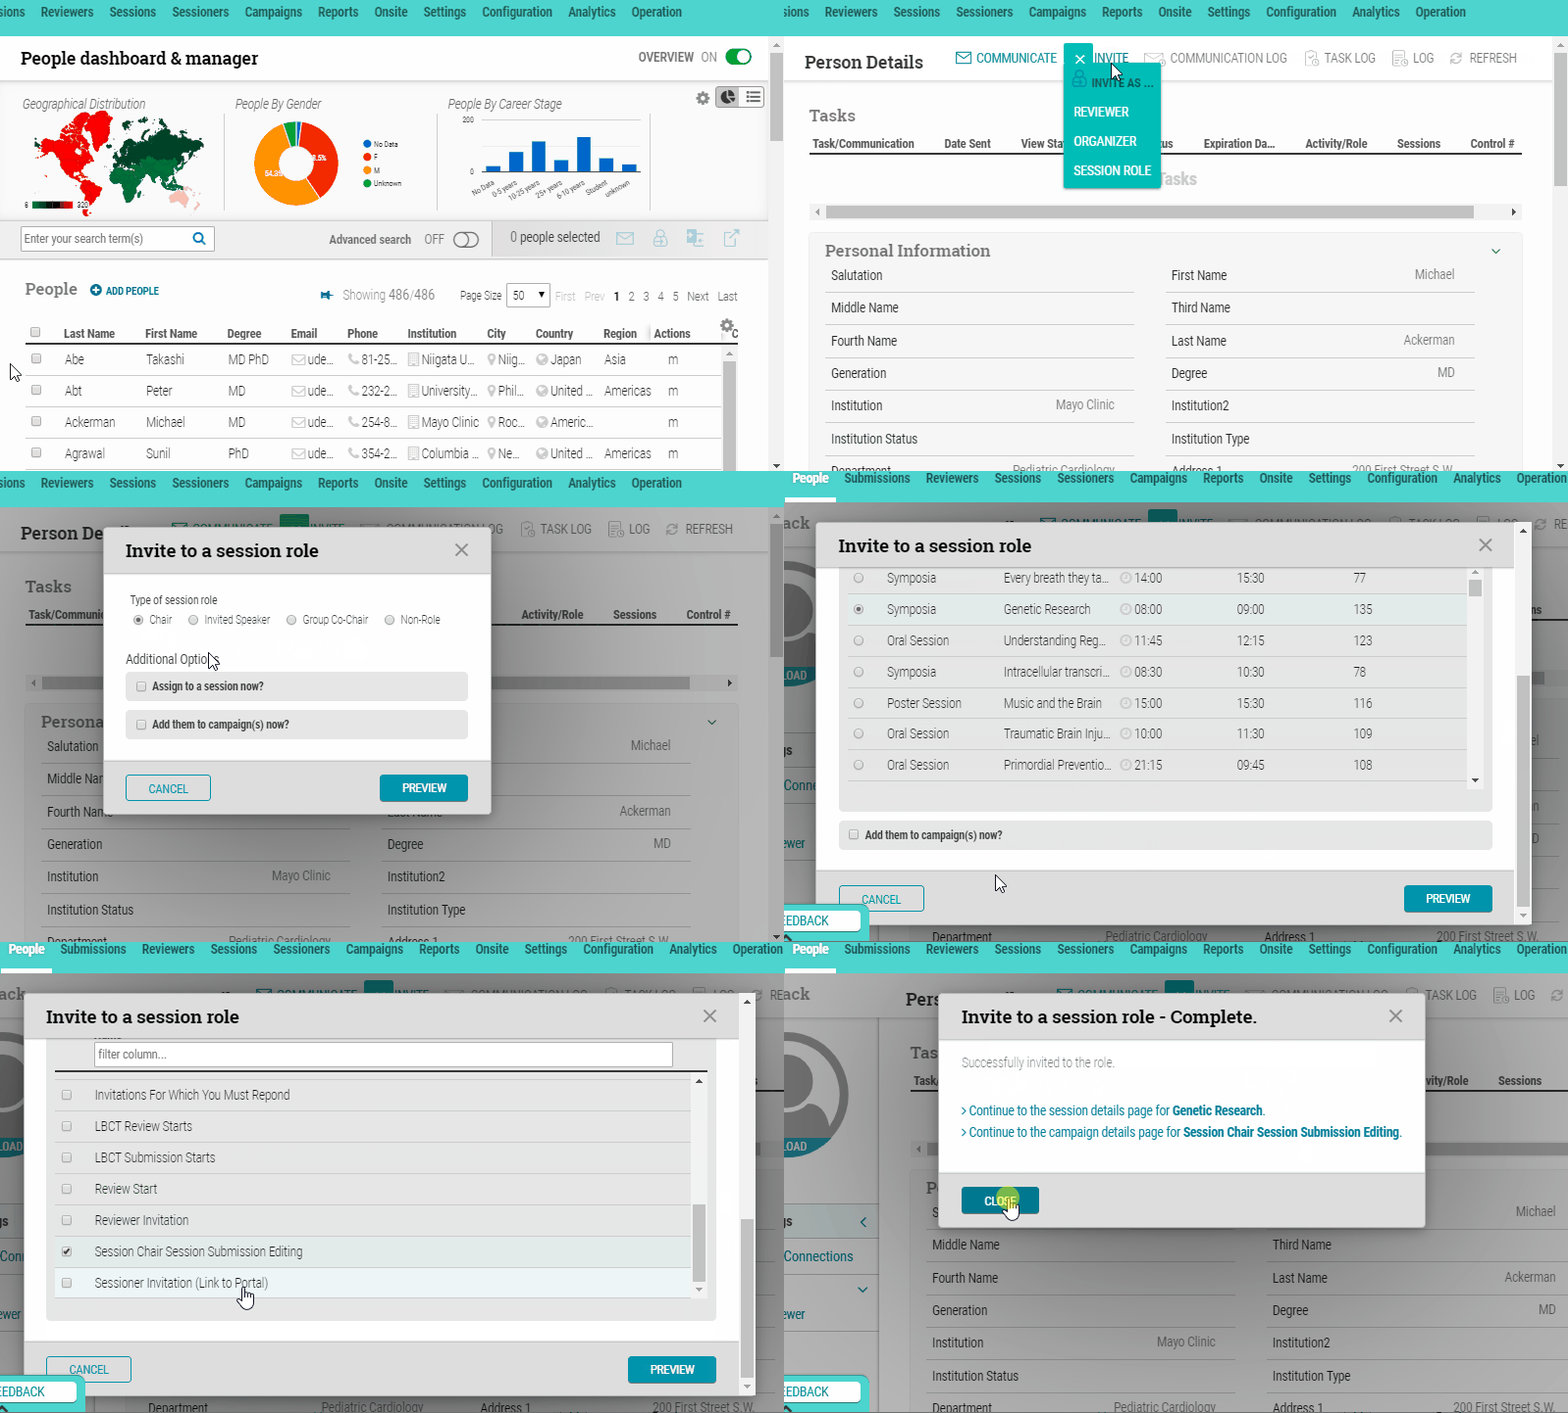
Invite to a Session Role

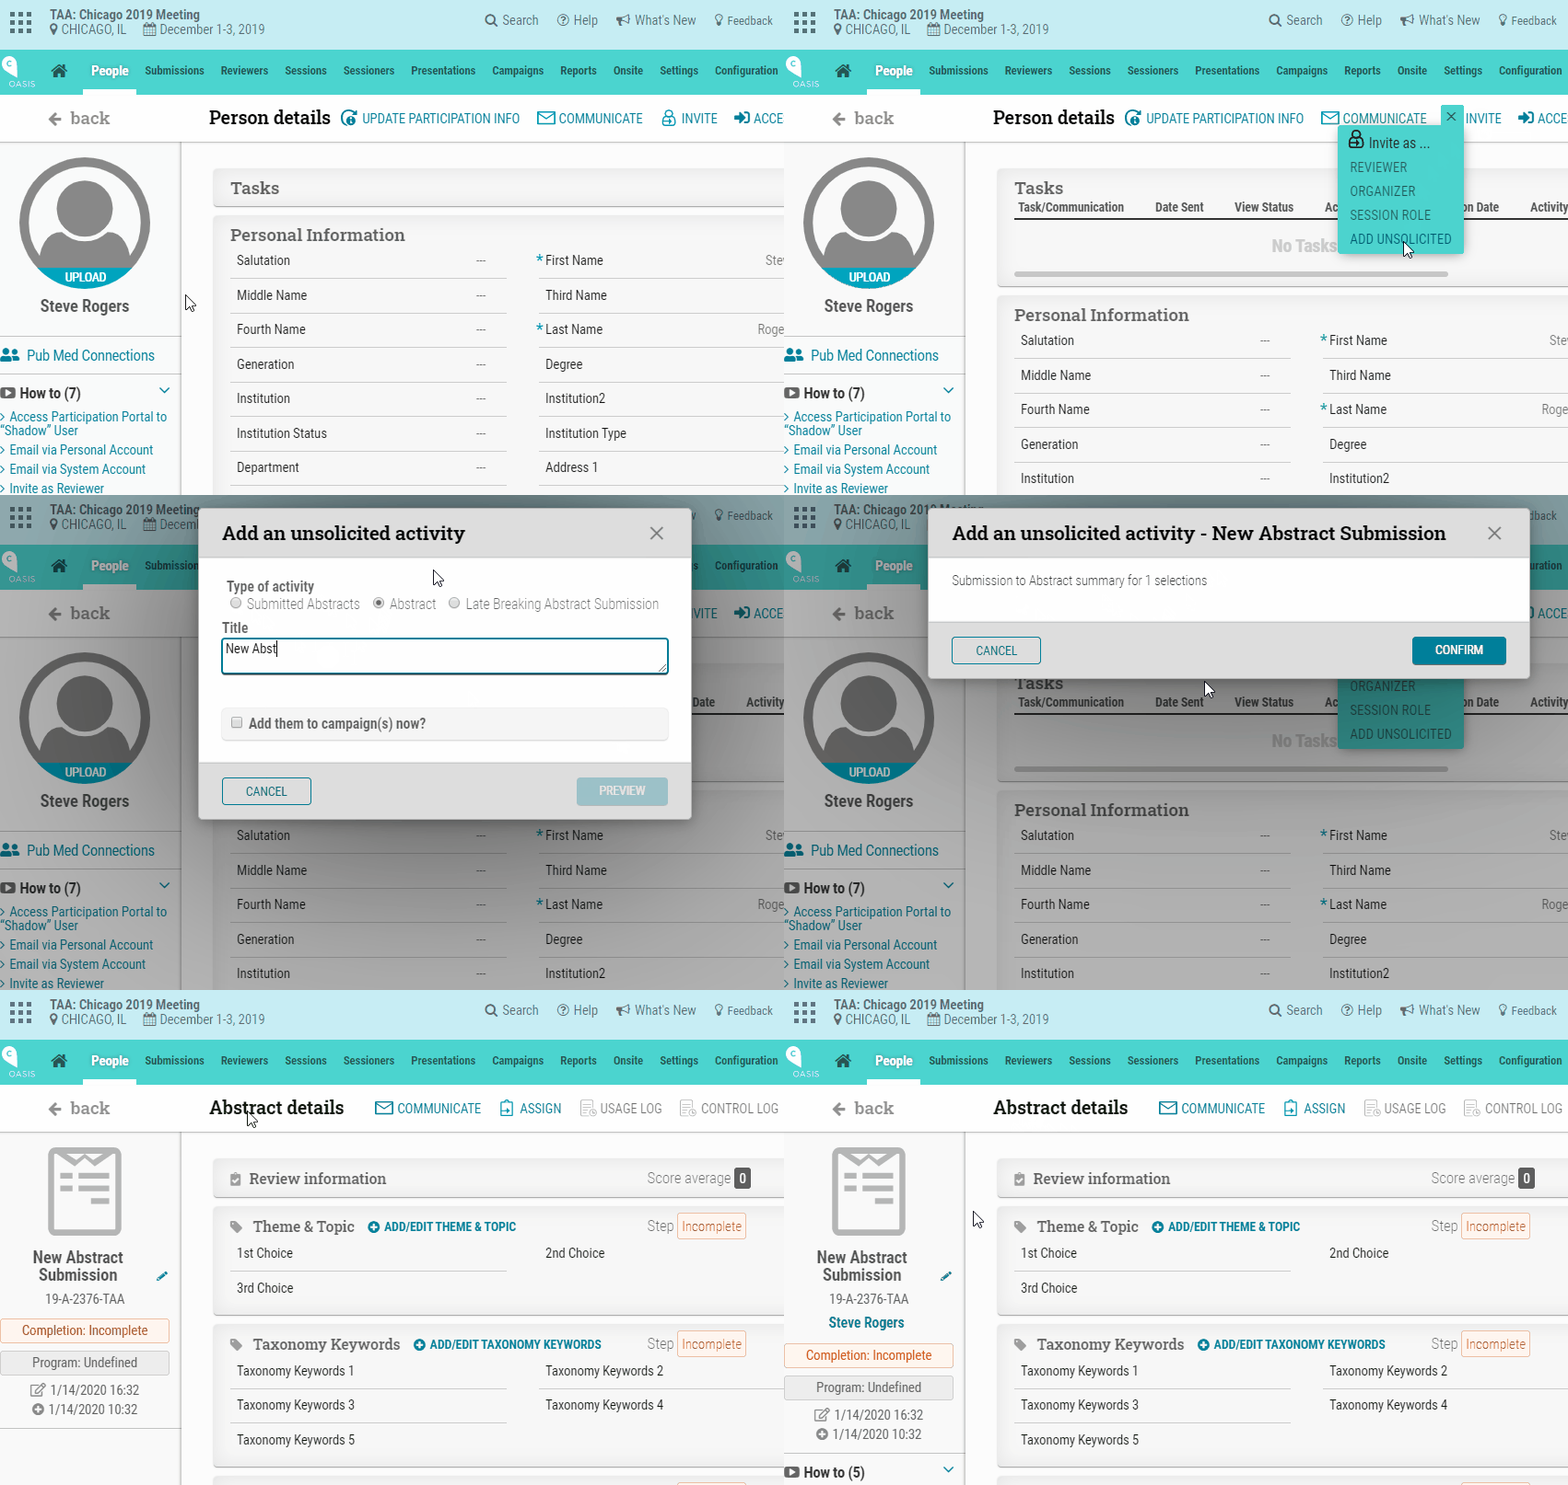
Click on a person record. Click “Invite” icon and select “Invite as Session Role.” Select the type of session role (can also assign to a specific session and/or add to a notification campaign, if needed). Click “Preview” and then confirm section to complete invitation to session role.

Click on a person record. Click “Invite” icon and select “Invite as Session Role.” Select the type of session role (can also assign to a specific session and/or add to a notification campaign, if needed). Click “Preview” and then confirm section to complete invitation to session role.

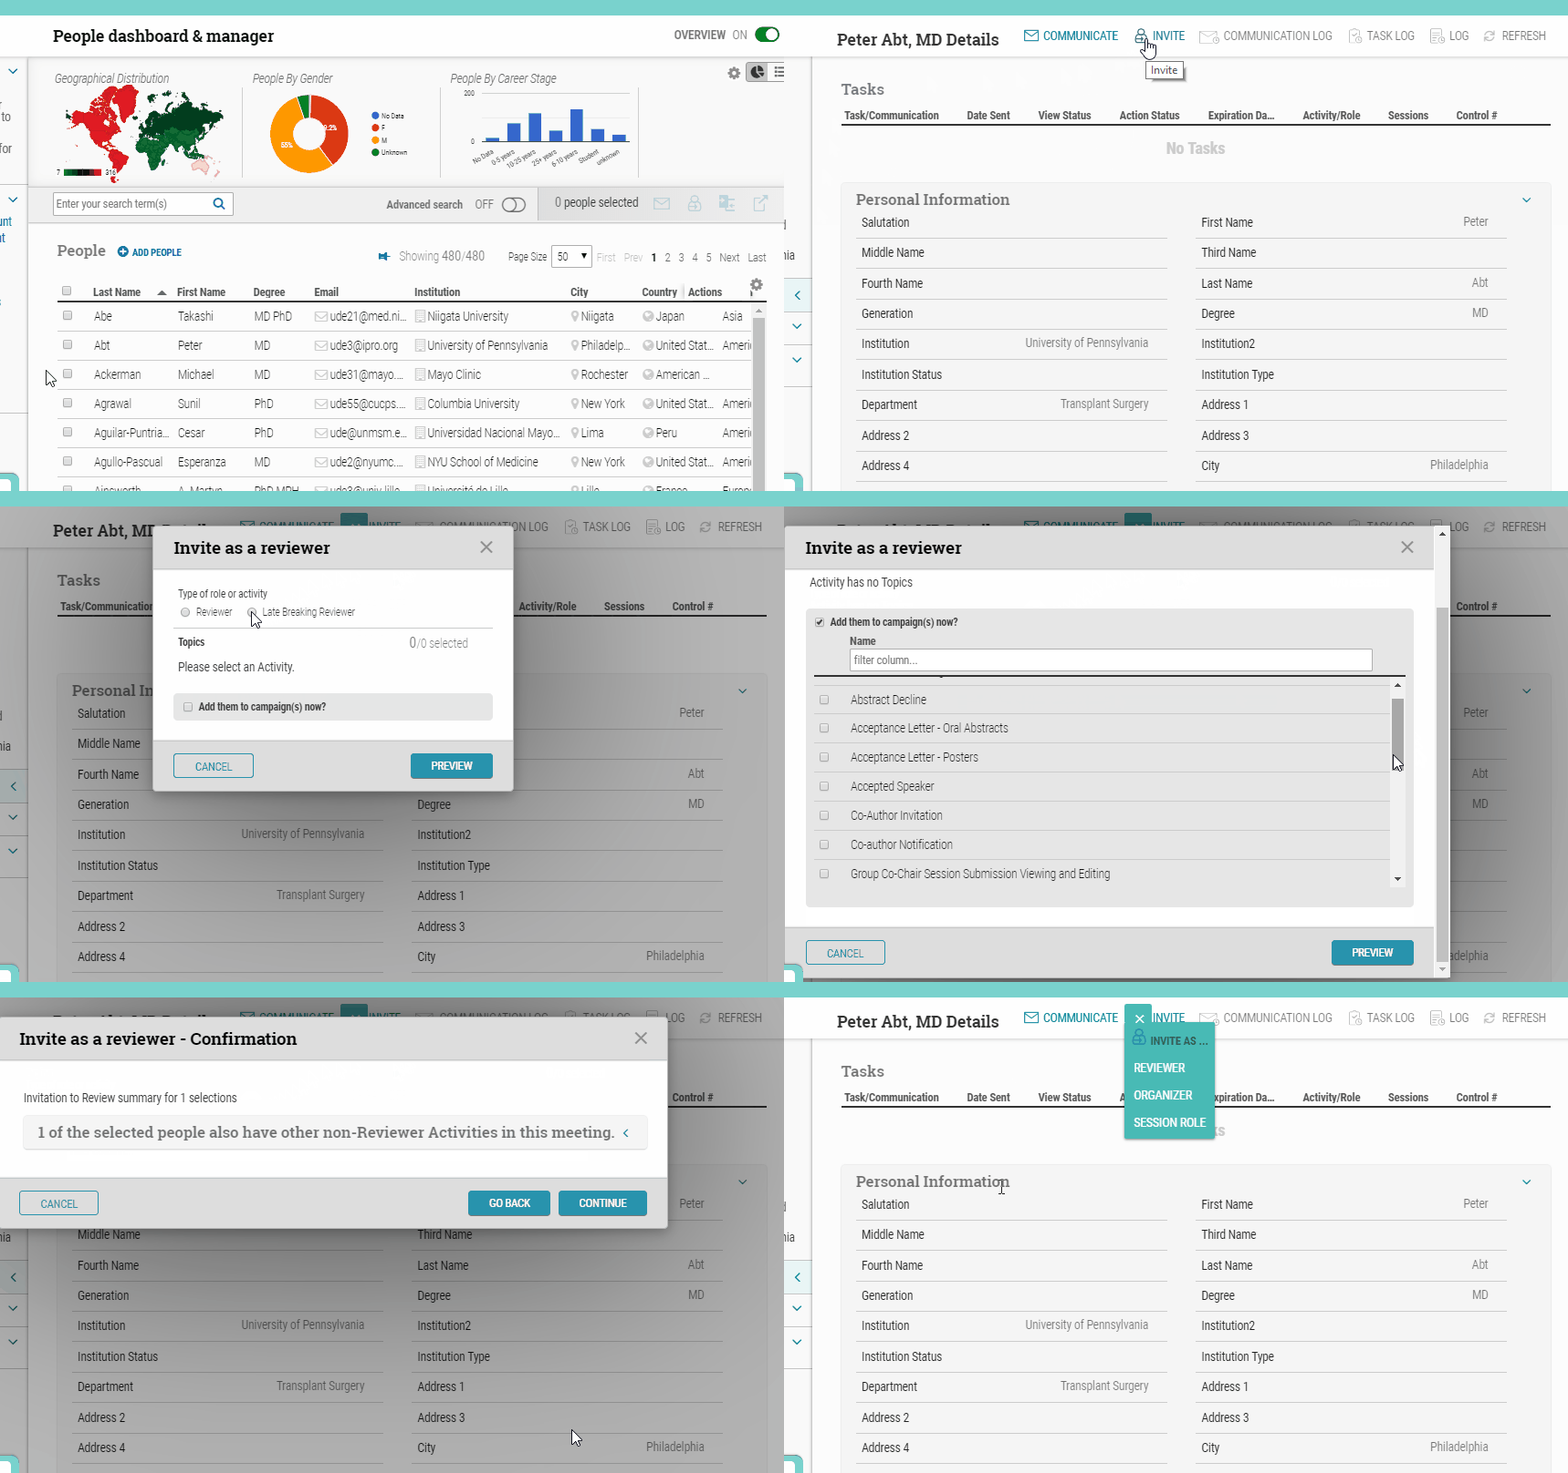
Invite as Reviewer

Click on an individual. In person details page, click on “Invite” icon and select “Reviewer.” Select applicable role, topic and notification campaign to send, then click “Preview.” Any potential conflicts will be displayed. Click “Continue” to complete assignment (or “go back” if conflict exempts this person).

Click to access the login or register cheese